When using deep learning in Python, setting up the GPU and CUDA environment is important. There are two main ways to do this:
● Personal use – You can install the latest CUDA and PyTorch versions that work best with your GPU.
● Work – You may need to use a specific version of PyTorch to match project requirements.
To make sure everything runs smoothly, your GPU driver, CUDA, cuDNN, and PyTorch versions must be compatible. Since reinstalling or rolling back versions can take a lot of time, it’s best to set up the environment correctly from the start and focus on actual development.
This blog explains how to set up the environment based on PyTorch 1.13, assuming your GPU meets the requirements.
1. Checking GPU Environment: Run ‘cmd’ and execute ‘nvidia-smi’ to check the GPU status
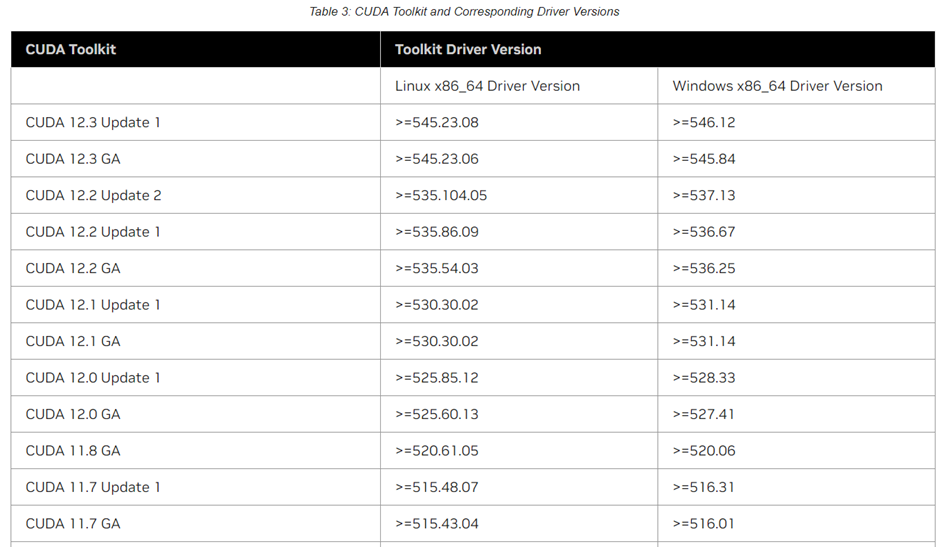
Verify the installed CUDA and driver versions. The CUDA version displayed in the command prompt represents the highest supported version, but older versions are also compatible. As of April 2025, the latest driver update for RTX 30 series GPUs includes CUDA 12.x and driver 5xx.xx. Visit the official website below to check for the latest updates and install them accordingly.
NVIDIA Driver: docs.nvidia.com/cuda/cuda-toolkit-release-notes/index.html#cuda-major-component-versions

2. Checking CUDA Version for PyTorch 1.13
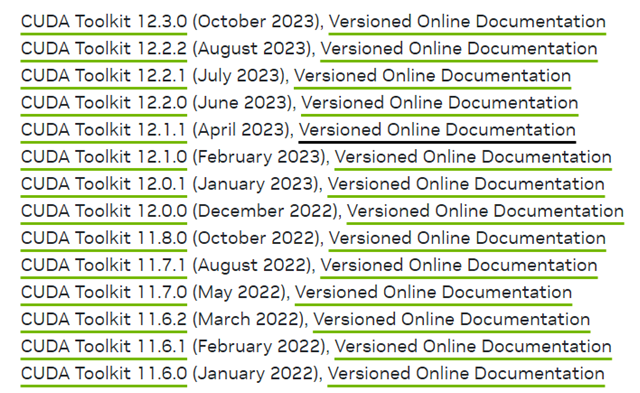
PyTorch can be installed using either conda or pip, and you should set up the CUDA environment based on your personal system before proceeding with the installation. In this step, we are only checking the CUDA version. PyTorch 1.13 is confirmed to be compatible with CUDA 11.6x and 11.7x.
pytorch.org/get-started/previous-versions/
3. Capability Based on GPU Environment
Additionally, you need to check the Capabilityof your specific GPU. For RTX 3050, 3060, 3070, 3080, and 3090, the capability is 8.6 and they can be used with CUDA 11.1 or later.
GPU Capability: en.wikipedia.org/wiki/CUDA
4. Setting Up the CUDA Environment and Installing PyTorch
Based on PyTorch 1.13, install CUDA 11.7.x, followed by cuDNN 11.x, considering the GPU capability. For cuDNN, extract the files and copy them into the folder where CUDA is installed to complete the environment setup. Finally, install PyTorch 1.13 using either pipor conda, as previously explained.
CUDA: developer.nvidia.com/cuda-toolkit-archive
cuDNN: developer.nvidia.com/rdp/cudnn-archive
5. Checking Environment Setup and Functionality: nvcc - - version
You can verify the installation by running "nvcc --version" (or "nvcc -V") in the command prompt “cmd”. The following code can be used to check whether the GPU is available.
import torch
print(torch.cuda.is_available())
Additionally, in practical applications, the code below can be used to automatically assign the device.
device = torch.device('cuda:0') if torch.cuda.is_available() else torch.device('cpu')
'프로그래밍 기술' 카테고리의 다른 글
| [C#] Winform 환경에서 메인 Main에서 서브 Sub 폼으로 이미지 전달하기 (0) | 2025.05.04 |
|---|---|
| [C#] DataTable 차집합 Difference 구하는 두 가지 방법 (0) | 2025.04.29 |
| 파이썬 Python D/L GPU 및 CUDA 환경 설정 (RTX 30 시리즈) (0) | 2023.12.17 |
| 인터프리터 언어 (Interpreter) 파이썬 Python, 매트랩 Matlab (0) | 2023.11.21 |
| 프로그래밍 언어 C, C++, C# (0) | 2017.06.21 |